Windy Militant
EBay can be a goldmine for wargaming scenery, I have been buying a lot of model railway scenery pieces for pennies in various states of distress with the intention of hacking them about for wargaming scenery. HO scale scenery works pretty well with 15mm and the level of detail on railway models makes pieces look a lot more realistic than a lot of wargaming specific scenery.
Another bonus is that it is in plastic, so they are relatively easy to work with, which is a real bonus as most of the time second hand railway kits look like they've been put together by a chimpanzee wearing mittens. Take this windmill which I will rebuild in this post, for example, the side door had been glued on at a crazy angle:
Another bonus is that it is in plastic, so they are relatively easy to work with, which is a real bonus as most of the time second hand railway kits look like they've been put together by a chimpanzee wearing mittens. Take this windmill which I will rebuild in this post, for example, the side door had been glued on at a crazy angle:
I wanted to make this windmill into a piece for the steppes of Russia, but the sail was damaged when it arrived, this is one of the reasons why it was so cheap. However, I had another windmill that Ninjasaurus Rex had given me a few years ago which I had never gotten around to dealing with yet and I figured I could reuse the sail from that one for this building instead (in fact I only realised the other day that the one he had given me seems to be modelled on the windmill from Chitty-Chitty-Bang-Bang, so I will probably never actually use it anyway...).
The first thing to do was break it down into its constitute parts. This is where the chimp's handiwork really showed through. Whatever glue they had used made it really difficult to get some of the smaller parts loose and I lost a couple of bits, like the ladder and walkway and the rear alcove. The roof also shattered as I prized it loose as well.
The first thing to do was break it down into its constitute parts. This is where the chimp's handiwork really showed through. Whatever glue they had used made it really difficult to get some of the smaller parts loose and I lost a couple of bits, like the ladder and walkway and the rear alcove. The roof also shattered as I prized it loose as well.
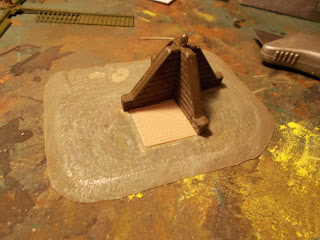
The upper part came away from the base easily, it was not glued, thankfully. It appears that the windmill was intended to move through some form of battery powered electricity and the battery was housed on the base in what appeared to be a missing area. This had to be filled, so I cut a small square of plasticard and fitted it in the gap, which brought the level up again.
I then cut out a square of embossed plasticard to the same size. This is embossed with stones, so it fits with the rest of the base, although it looks like an area of relaid stonework. Yards get repaired all the time, so the difference in stones doesn't concern me.
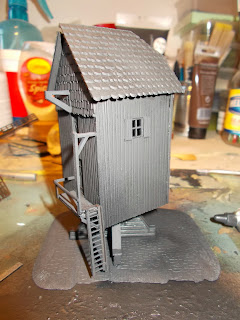
I put the base to one side to dry and undercoated it black. There is little left to do with it right now, so I turned my attention to the body of the mill. The square nature of it looked a little bare, so I thought I'd rebuild the previously destroyed alcove area at the back, it would also cover the mess left by the original one. This was constructed from three sides of plasticard with a slope for the roof.
As that dried I also turned back to the walkway on the front of the mill. This had shattered as I tried to remove it, so needed to be rebuilt as well. This was dead simple, I cut a single rectangle of plasticard and attached another piece of embossed plasticard on top. This second piece was embossed to look like thin planking.
This was then trimmed off after it had dried to the size of the walkway. I also added two small slivers of plasticard to either end of the walkway as supports, these will also be trimmed to size in due course. It now looks a little more stable!
Now it was just a case of adding more details to the outside of the building. I added a hand rail for the walkway. This was also attached to a frame which had survived the initial cutting operations and it just added a little more depth to the architectural features of the building. I also added two shutters for the small window to the right of the door. These were already on the model, but again, didn't survive removal. My new ones cover up the remains of the old ones that wouldn't come off. Finally, I cut a triangle of plasticard for the hoist above the door.
At this point I tried the building out next to a 15mm figure that was kicking about on my work bench. You can see it has the correct dimensions for this scale.
With not much more to do on the main body of the building I turned back to the little alcove room. I clad the sides and front in more embossed plasticard, stuff that looked like planking. These were all trimmed to size after they had dried on the plasticard walls, then I added two strips of V shaped plasticard to the front edges. These trimmings disguise the joins of the other pieces of plasticard and look like strengthening architectural features.
The last bit was the roof, this was cut from embossed plasticard, but with wider lines than the wall material. it looks like a few wooden planks. To emphasise this, I delicately cut the ends of each plank to slightly different lengths. This adds to the feel that this feature is a later addition to the building and and also adds to the overall 'rustic' feeling of the model.
The entire feature was then glued in place over the area that the previous extension had sat, neatly covering the mess that that the original one had left! So that was it pretty much for the main body and base of the windmill, besides painting:
I did a bit of ferreting about on the internet machine and found this picture of some windmills in Russia on Wikipedia. They look very similar to the one I am building and you'll notice that the wooden structures are very grey due to the weathering of the timbers.
The first thing to do was give it a heavy drybrush of German Grey over the black undercoat. This drybrush included the stone work on the yard floor, and was quickly done with a large sized soft brush.
Next the windmill got another dry brush of Neutral Grey, this picked out all the little details and was enough to make the wood look like aged timber. I did the same with the sails that I had cannibalised from the other windmill.
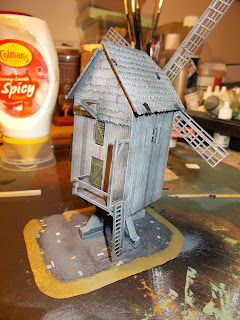
I then started to pick out details on the rest of the building. The doors were painted in Reflective Green, with an ink wash of black, just to make them different and stand out. I also ink washed several planks and tiles in black and Hull Red, again to break up the shape of the boxy windmill. Finally, I picked out a few of the stones in the yard in various greys and browns then ink-washed it all in black. I also added the windmill sails, they needed fixing place properly, but this is how it looked so far:
The last thing to do was paint the border of the yard in Dark Green, ink washed in Flat Earth and then dry brushed with Yellow. And it was finished, as simple as that. The last thing to do was add some grass tufts to the base to give that a bit of shape and here it is:
It took about three days in total, including drying times and I'm rather happy with how it turned out. Now I just have a box full of HO scale buildings that I need to address...
Thanks for looking!
It took about three days in total, including drying times and I'm rather happy with how it turned out. Now I just have a box full of HO scale buildings that I need to address...
Thanks for looking!


An excellent windmill - I admire your skill !
ReplyDeleteThanks Mosstrooper, the skill was all in the railway model, I just slapped on some paint!
Delete