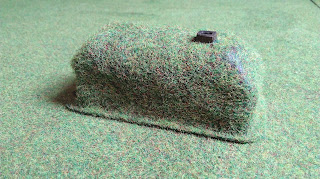
Little House on the Grasslétta
First, I must apologise, this post was accidentally published too early! It was before I had written the accompanying text and posted up some more pictures, so this is take two.
Having picked a few 15mm Vikings at Vapnartak, I decided on writing some home-brew rules for Viking skirmishes in the age of the Sagas. To go with this, I wanted to make an Icelandic turf house, typical of the age, to use as scenery or a scenario objective. This was an experiment on my part, to see if it was easy enough to do and if the results would be useful. I have seen lots of thatched wooden Viking style buildings, but in the Arctic north, turf houses were de rigueur, right up until the 1950s when they were outlawed on health and safety grounds.
So, as inspiration, I took a starting point with Erik the Red's turf house reconstruction at Eiríksstaðir. It's a simple shape, with a slightly bowed roof, chimney and entrance:
It's also covered in turf which gives it the defining look that I was looking for. Additionally, it is also small enough to use as a practise piece. The first stage was to take some plasticard and make a basic box shape, glued onto a cut down vinyl tile:
The next stage was to add the roof, this was done by using struts inside the building to hold up the central panel as it all dried. I then added the two long pieces, as you can see they are not very neat, but this just a frame, not the finished product. In this stage I also added the chimney, cut from four squares of plasticard, clad in embossed plasticard. The front porch was also made from small bits of plasticard to get the look correct. Finally, I added embossed plasticard stonework as a path as well. This was then left to dry overnight.
The next task was to cover the whole thing in DAS modelling clay. This is a pretty cheap air-drying clay that is easy to work with. It was my first time using it, so I was glad to see how easy it was to use, especially if it is wetted down with water. I scored the plasticard and covered it in PVA glue to help the clay adhere to the flat surfaces and built up the shape I was after:
This was then left to dry in the boiler room overnight and what emerged was a pretty solid structure. The whole building was undercoated in Vallejo's German Camo Dark Brown. I would have used Burnt Umber for this, but the two colours are pretty close and I'd run out of Burnt Umber painting my gaming boards... The dark blackish-brown is a good colour for the Icelandic peat that the turf houses were made from, but at this stage it's looking more like a turd house than a turf house, however, this is only a base coat for the later stage...
...Which was to cover the entire thing in flock. This, I did, with PVA. I then painted the details of the porch and the chimney, giving them a wash and some highlights. Here it is from the front:
And the back:
To give you an idea of the scale of it, here it is with a sneak peak of some of the Vikings I have painted (more on these in a later post!). It is slightly higher than the original it was based on, but it still works for me.
It was surprisingly simple to make and took me a few days to complete, spending no more than an hour a day on it. The next job is to make a few smaller turf outbuildings like a piggery or cattle enclosure and some small turf walls to enclose the farm. I will also tackle a longhouse at some point in the future, using the same techniques as this, so check back for details on that!
Thanks for reading!


Very interesting, looking forward to seeing how this turns out.
ReplyDeleteThanks, unfortunately this was published too early, so now I have added the text and more pictures of the finished thing!
DeleteThis is going to look great. Also looking forward to the final result.
ReplyDeleteThanks, unfortunately this was published too early, so now I have added the text and more pictures of the finished thing!
DeleteAnd brilliant it is too. Very well done!
Delete