Star Wars Legion Stormtroopers Painting Tutorial
I have been painting quite a few Stormtroopers for Star Wars Legion recently and I thought I would put together this tutorial to show you how I do mine. There are lots of tutorials out there and you should always paint your toys however you want, but it can help to have a different view on things, so hopefully this will help someone.
First things first. The figures need building, but with only a couple of pieces for each figure they are dead easy. Fantasy Flight Games supply each figure in a bag with their arms so keep them separate otherwise you'll have to sort out which arms go with which figure and it's not always obvious! Although the figures are plastic, you'll need Superglue for putting them together and sticking them to their bases. There's a lot of Superglues available, but I use Loctite, it's worth paying a little bit more. You'll also notice that I have no specialist figures in this batch I am painting, that is because I am organising my Legion figures differently and don't need them. You'll see why at the end of this post, but it's also enough to know that they would be painted exactly as these other figures anyway.
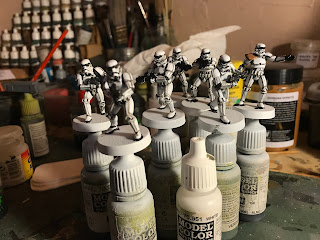
Superglue usually doesn't take very long to set, but you can also use a CA accelerator to speed matters up. Once it has set, I Blutac my figures to old Vallejo paint bottles. This helps you paint them without holding the base and allows you to get into some hard to reach places. The first actual painting step is to prime the troopers, you can use any you like, but I use PlastiKote grey primer, it's a good primer and is about half as cheap than Games Workshop's primer... I use grey for the Stormtroopers, as it adds a shade below the white armour which in turn adds a bit of depth to the figures. Bare in mind that sprays have a big coverage area, so I use cheap plastic gloves that I wear when spraying as spray paint can be difficult to remove from your skin! Also, spray into a box to stop the paint going everywhere and in a well ventilated area!
Speaking of white, the next big hit is spraying the figures in white. Here again, I use a cheap spray paint that I bought in Wilko, as long as it it is shook up properly and you test spray something before you start it is a good paint for this purpose. Make sure you cover the figures but not too heavy to lose any detail, hold the can about six to eight inches away from the figure when spraying (and don't forget your gloves!).
Now we begin with the detailing starting with the darkest parts on the armour and the under-clothing. In all the films, these look black, but black is too stark a shade, especially for cloth, so I mix Vallejo's Black with equal parts German Grey. This gives the black a slight greyish tint and means you can still see individual details like fingers and any folds in the cloth. I use this mix to also paint the eye pieces, the band around the top of the helmet, the mouth piece and the small details on the front of the helmet. On top of that, I will paint any cloth that shows and the soles of the boots. Next, I mix a small amount of Games Workshop's Bolt Gun Metal (This is a great paint and I have had the pot in the picture below for a couple of decades...). This mix is used to paint the weapons. Finally in this stage, I use Vallejo Brown Sand to paint the pauldron on the commander. It is worthwhile noting that this stage doesn't need to be perfectly neat, as long as the black/grey mix is in the right place, we can neaten everything up later.
Moving on, it's time to shade the armour. Leaving it just white would give no depth to the detail and make the figures look flat. White is a difficult colour to shade, but we have some help in the form of Games Workshop's Nuln Oil wash. It's very rare that I praise Geedub, but this ink wash is the mutt's nuts. It has an excellent flow and reacts to detail very well. Well worth every penny of the £3,456,183 each bottle costs*. Use this to line all the upstanding parts of the armour, if you are careful the wash will flow into the correct position without too much trouble, but it's worth taking your time and practising before starting. Lining every crease and crevice is a boring job, but worth it.
*not really, but it is expensive...
Here's a close up of the figures post-washing. Again, it is worth trying to be as neat as possible here, but it can all be cleaned up in the next stage. Also, use the Nuln Oil to wash the weapons and the commander's paulrdon. You could wash the under-clothing as well, but the effect won't be very obvious, so I don't bother. We're painting gaming figures, not Golden Demon winners!
Now it is time to clean up the figures and we are on the final stretch. Using Vallejo's White, carefully cut in the detail lines on the armour to make the black wash lines appear as thin as possible. Also, use the white to cover up any mistakes from the previous steps. Being as a careful as possible here is the key, you want the black and ink wash to show through as thin lines, but not too thick. If you over paint with the white too much, you can always go back and rewash the areas.
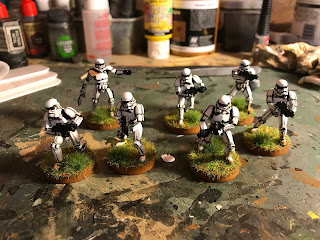
There is no point in spending a lot of time painting the figures only to ignore the base. Think about where these Stormtroopers are operating, what planet are they on? What is the ground cover? Sand? Woodland? Rocks? My figures' bases are painted to fit in with my gaming board which is a green grass board, but you can do yours as your needs require. With this in mind, brown is always a good base colour for grass, much better than green, as it represents the natural mud. I use Vallejo's Flat Earth (the paint, not the mad theory...), painting carefully up to the feet of the figures.
Then using this base colour, I weather the lower legs and boots of the troopers. Take a small piece of foam (I use foam that comes in blister packs or figure carry cases) and rip it so that it has an uneven appearance. Using a pair of tweezers pick up the foam and slightly dip it into your base colour, dab off excess paint and gently dab it on the figure's legs and feet. This will give you a splash of colour on the legs that looks like mud spattering as the figure runs. Practice this before doing it though!
Nearly there now! It's time to protect the figures. I use an artist's spray matt varnish from Winsor & Newton. I have used this for years and never had a single problem with frosting which is something I have encountered with other varnishes I have tried in the past. You may have one you prefer, but I cannot recommend this enough. I have also heard that matt varnish isn't as strong as gloss varnish, but again, I have never had a problem with just using matt. However, if you are worried, use a gloss varnish, then when it is dry, respray the figures in matt.
Once the varnish is dry finish the bases off with your choice of basing material. I use railway modeller's flock/static grass from Javis. It comes in many different shades and lengths, and mine matches my gaming board. I also add some grass tufts, which I buy from EBay (you can make your own, but I'm too lazy...) to break up the shape of the base. All the grass and tufts are glued on to the base with PVA glue, a water based white glue that is easy to use.
So this brings the whole process to an end and, as I mentioned at the beginning, finishes off my Stormtrooper force of a platoon of four squads. This is based on West End Games' army lists in their Star Wars Miniatures Battles rules. Each squad is eight troopers, with a commander and two heavy weapons, with over-all command is from a Lieutenant and a sergeant.
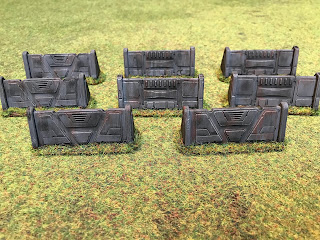
Hopefully, this tutorial will help someone, or at least give you some ideas about painting the men in white. As I was painting these figures I also painted some of the barricades that come with the Legion core box. This was a follow on from the ones I had previously painted and I used the techniques again to create another batch of weathered terrain pieces:
I'll be turning back to the Rebels soon, to finish off a large enough force to use in a game. I will put up a painting guide to them as well, when I do. Thanks for reading and please share this with anyone you think would benefit from it!


However, concentrations of nitrite usually are below 36 µg/mL in such specimens, while nitrite concentrations are 1,910–12,200 µg/mL in urine specimens adulterated with nitrite (9). Nitrite can be easily detected by simple spot tests. Addition of a few drops of a nitrite-adulterated urine specimen to 0.5 mL of 1% potassium permanganate solution, followed by addition of a few drops of 2N hydrochloric acid, turned the pink permanganate solution colorless with effervescence. Another spot test to detect nitrite used 1% potassium iodide solution. Adding a few drops of nitrite adulterated urine to 0.5 mL of potassium iodide solution, followed by addition of a few drops of 2N hydrochloric acid, resulted in immediate release of iodine from the colorless potassium iodide solution.
ReplyDelete