Another Brick in the Wall
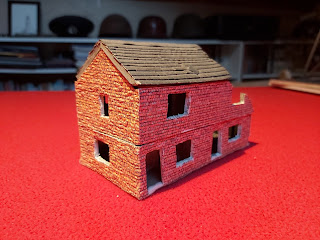
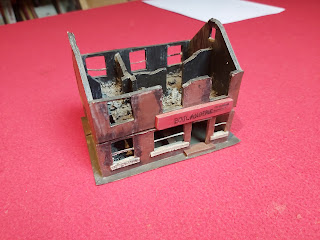
Some of the first pieces of terrain I ever built, over twenty five years ago, were these houses I made from mounting board (the stuff with a foam centre). I made them for my 15mm WW2 skirmish games and they still make an appearance on my table now. However, they are very basic and I decided to revisit them recently. I bought some textured brick printed paper on ebay and took the grey building as my first experiment.
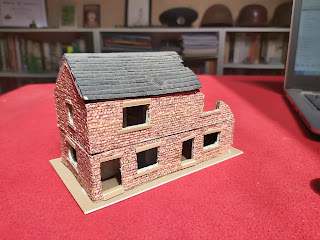
The first thing I had to do was remove the window sills as it would have been difficult to cut the paper around the shape and gluing the paper to a flat surface is a lot easier. It didn't take very long to cut out enough paper to wrap around the top floor of the building (each floor is separate, which helps) and I began to see the transformation immediately.
Then, I simply repeated this with the ground floor. Also, you'll notice, I cut the original base off the building. This was an old cereal packet and it was bent and thin and generally rubbish. I decided to replace it with embossed plasticard...
I mounted the building on the platicard, to give it a base and represent a raised pavement area. Also, I cut out thin strips of Platicard for the window sills and door steps and again, that really improved the look overall.
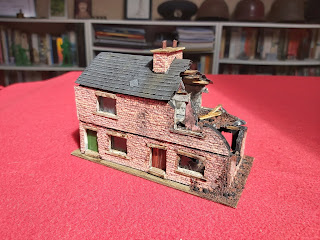
I realised there was something missing... A chimney! So I built a suitable one out of thick mounting board, wrapped in the brick paper with a plasticard top and a couple of chimney pots. I originally put it on the gable end of the house, but it didn't look quite right.
I thought the chimney would look better in the centre of the roof and wouldn't unbalance the model. Also it justifies the two pots as you have two fires leading up to it from within the house. I was now on the the detailing stage. First I added two doors, cut from plasticard, which I scored with a knife to represent panels and painted and weathered. I used my rubble mix to go over the original cat litter rubble that I had used and tie in the colours to the bricks. I repainted the roof, dry brushed it and weathered it with weathering powders and weathered the base with a wash. Finally, I weathered the rest of the building, varnished it and then added window glass cut from an opened miniatures blister pack (everything can be used!). If you are adding windows to models, ensure you add them after the varnishing as it will frost the plastic otherwise.
I also added some snapped matchsticks for collapsed roof beams, these were weathered with a simple wash. I could have added more, but I want space to be able to get figures in during a game.
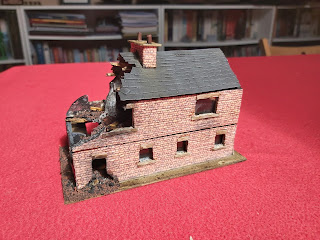
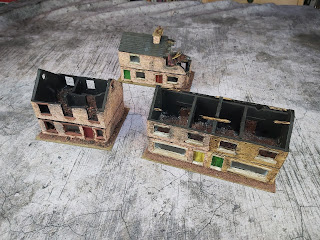
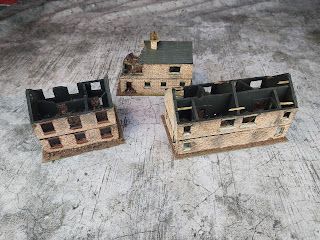
And that was the first one completed. As you can see from the first picture, I also had another building that had been scratch built, I also had the one in the picture below. I wanted to sort these two out as well. I followed the exact same steps as before...
And they were soon completed!
And they were soon completed!
I am very pleased with how all of the buildings had turned out and it was the simple addition of a few details along with the brick paper. I have a few more older buildings which I will turn my attention to, but for now, I am happy.
Also, on Youtube, I recently released a tutorial video on painting 6mm French Napoleonic Infantry. This is how I do all of my Blucher bases, from beginning to end.






Excellent idea... I may give this a go myself. eBay here I come!
ReplyDeleteCheers Lee, the paper certainly adds a bit more to some tired old models.
DeleteThose are great- really lifted them up from what they were before.
ReplyDeleteCheers,
Pete.
Cheers Pete, yep, I was surprised at how they turned out with minimal effort on my part!
DeleteYes I think you get a great effect from printed paper. We took a brick wall picture and re sized it for our 28mm minis -then printed lots of it on A4 sheets -we used it for Stalingrad... http://glasgowwarhog.blogspot.com/2019/
DeleteWe also used the same technique on floors for concreate floors inside the factory we did.
If its pasted onto mdf you can dig into it and make some holes etc.
Just for info ...I found double sided tape really useful and the best way to keep it wrinkle free when doing large flat areas.
Nice job...and it doesn't break the bank.
Grreat post
ReplyDelete