Soviet 45mm AT Gun Step by Step build
In this post I am going to go stage by stage through the building and painting of a box of Plastic Soldier Company's Russian 45mm Anti-Tank guns. These have been in the pile of untouched things for a while now, so I thought I'd get on with constructing and painting them. I'm not sure where they are going to fit in with the rest of my forces, but I was thinking of putting together a Soviet Motorised Battalion at some point, so at least one will sit in that. OK, if you are sitting comfortably, I shall begin...
First things first, I painted the guns and crew black on the sprues, so they were already undercoated when I cut the various pieces off ready to build:

There is options in the box to make an M1937 45mm gun, an M1942 45mm Gun and an M1943 76mm Gun. I settled on the two 45mm versions, the M1937 on the left and M1942 on the right with the longer barrel as I wanted them for the early war period. They went together really well and easily which is a real strength with all of PSC's models:

With the guns built, I turned my attention to the crew. I wasn't keen on the pointing figure in the set and as Rapid Fire! only requires three men for a gun of this size, I cut out twelve different posed crew. These were then glued to a Flames of War medium base, as this was the perfect size for the guns and added a layer of all purpose filler to disguise the figures individual bases and give the stand some shape.


As the PVA and sand was drying I turned back to the guns which were now dry. These were given a couple of coats of Vallejo Russian Green and ink-washed with some artist's black acrylic paint watered down. I find that the Vallejo Russian Green in particular takes an ink-wash really well.

Using Russian Green mixed with Vallejo White I dry brushed the guns, just enough to draw out edges and a few details, then painted the tyres black. All that now remains to do with these is dry brush Vallejo Khaki on them for dust, so these were then put to one side.

Back to the crew and bases, after the PVA and sand had dried I undercoated the entire base and figures in black to further seal the sand. I always undercoat in black, I know it dulls colours slightly but it also masks mistakes and missed bits!

The first stage of painting the base is Humbrol acrylic Dark Green 30. I have used this shade for decades and it matches my table, also it makes all of my figures uniform. If nothing I'm stuck in my ways.

The green is then ink washed with Vallejo Flat Earth, to give it some depth:

After the wash has dried, the bases are drybrushed with yellow. It gives the base a bit of tone, I think. Here you can see that I have also re-undercoated the crew with black ready to paint them.

And here they are painted! I used Vallejo Russian Uniform for the clothes, highlighted with a mix of Russian Uniform and Vallejo Khaki Grey. Khaki Grey was used for all the straps and bags, Vallejo Russian Green for the helmets, Vallejo Leather Brown for the pistol holsters and Vallejo Beige Brown for the water bottles. The highlights of these colours was really just a mix of the base colour with white. I don't ink-wash 15mm figures, only a base coat and then highlight, as I have the two foot rule; if it looks good from two feet away it will look good on the table!

The guns' wheels were brushed in Khaki and fixed on the bases along with the ammo crates and all of them sprayed with Matt varnish.

The final stage is adding the detail to the base. I am a recent convert to static grass, previously I was never sure how to use it, but I bought some, experimented and was really pleased with the results, so now I use it on everything. Along with this I use railway modeller's ballast to break up the shape of the base. So here they are, after two days work and I am pretty pleased with the result:


I just need to build the rest of the Motorised Battalion now..
Thanks for visiting!
First things first, I painted the guns and crew black on the sprues, so they were already undercoated when I cut the various pieces off ready to build:

There is options in the box to make an M1937 45mm gun, an M1942 45mm Gun and an M1943 76mm Gun. I settled on the two 45mm versions, the M1937 on the left and M1942 on the right with the longer barrel as I wanted them for the early war period. They went together really well and easily which is a real strength with all of PSC's models:

With the guns built, I turned my attention to the crew. I wasn't keen on the pointing figure in the set and as Rapid Fire! only requires three men for a gun of this size, I cut out twelve different posed crew. These were then glued to a Flames of War medium base, as this was the perfect size for the guns and added a layer of all purpose filler to disguise the figures individual bases and give the stand some shape.

When the filler had dried overnight I painted the bases with some PVA glue and dipped them in sand to give the base further texture. I used to paint the figures separate from the bases, but always found if difficult to do the base after the nicely painted figures were set on it, so in recent times I have swapped the process and started with the base first. This way I can be pretty sloppy and quick to finish the base and not have to worry about making a mess of the figures.

As the PVA and sand was drying I turned back to the guns which were now dry. These were given a couple of coats of Vallejo Russian Green and ink-washed with some artist's black acrylic paint watered down. I find that the Vallejo Russian Green in particular takes an ink-wash really well.

Using Russian Green mixed with Vallejo White I dry brushed the guns, just enough to draw out edges and a few details, then painted the tyres black. All that now remains to do with these is dry brush Vallejo Khaki on them for dust, so these were then put to one side.

Back to the crew and bases, after the PVA and sand had dried I undercoated the entire base and figures in black to further seal the sand. I always undercoat in black, I know it dulls colours slightly but it also masks mistakes and missed bits!

The first stage of painting the base is Humbrol acrylic Dark Green 30. I have used this shade for decades and it matches my table, also it makes all of my figures uniform. If nothing I'm stuck in my ways.

The green is then ink washed with Vallejo Flat Earth, to give it some depth:

After the wash has dried, the bases are drybrushed with yellow. It gives the base a bit of tone, I think. Here you can see that I have also re-undercoated the crew with black ready to paint them.

And here they are painted! I used Vallejo Russian Uniform for the clothes, highlighted with a mix of Russian Uniform and Vallejo Khaki Grey. Khaki Grey was used for all the straps and bags, Vallejo Russian Green for the helmets, Vallejo Leather Brown for the pistol holsters and Vallejo Beige Brown for the water bottles. The highlights of these colours was really just a mix of the base colour with white. I don't ink-wash 15mm figures, only a base coat and then highlight, as I have the two foot rule; if it looks good from two feet away it will look good on the table!

The guns' wheels were brushed in Khaki and fixed on the bases along with the ammo crates and all of them sprayed with Matt varnish.

The final stage is adding the detail to the base. I am a recent convert to static grass, previously I was never sure how to use it, but I bought some, experimented and was really pleased with the results, so now I use it on everything. Along with this I use railway modeller's ballast to break up the shape of the base. So here they are, after two days work and I am pretty pleased with the result:


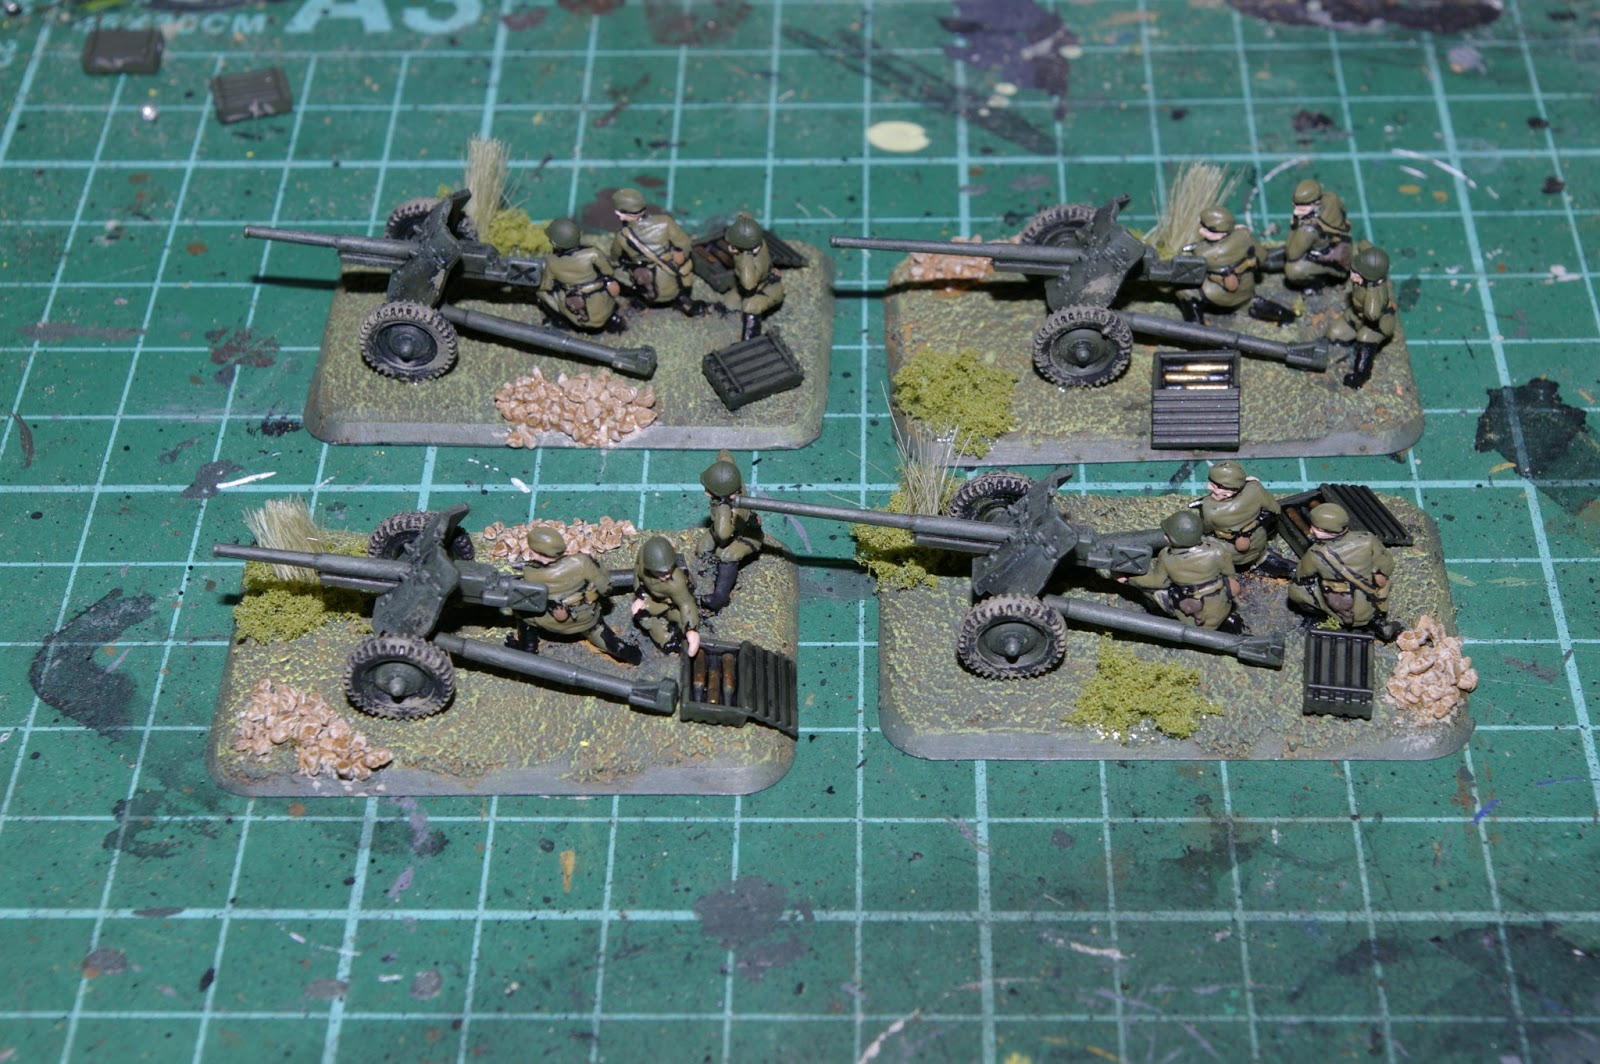
I just need to build the rest of the Motorised Battalion now..
Thanks for visiting!

Nice guide, and streamlined technique. The number of these things I've read where people faff around for no reason; this is much better. Do this, do that, bam, looks good.
ReplyDeleteThanks for that, always nice to have positive feedback, I may do more tutorials like this in the future!
Delete