The Battle of Amiens 8 August 1918 AAR
The Battle of Amiens on the 8th of August 1918 broke the German army and the following 100 days saw the end of the First World War with continual and coordinated Allied attacks on a defeated and retreating enemy. The 8th of August was a massive victory, but is overshadowed by such battles as the Somme and Third Ypres, which in turn had led to this point. Possibly because it doesn't fit into the accepted narrative of the First World War the battle hasn't received the attention it should. On Sunday Ninjasaurus Rex and I met to re-fight the battle as a Square Bashing game.
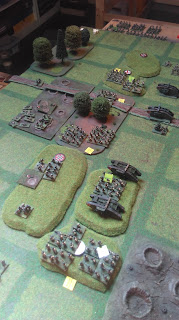
We used the scenario number 4 from the Square Bashing Army Book, which includes the army lists, but no maps. The scenario allows the German player to set up the scenery, with the British player laying the road. The forces were: British 58th Division (General Ramsey): 3 Professional Infantry Battalions, 6 Regular Infantry Battalions, 4 Heavy Tanks (Mark Vs), 4 Machine Guns, 3 Field Guns. The Germans facing them were from the 11th Corps (General Kuhne) with 6 Reservist Infantry units, 5 Regular Infantry Battalions, 4 Machine Guns and 3 Field Guns. The Germans also had five hasty defences they could place, but were restricted in their movements for the first turn due to mist and confusion. On top of this, the count-down timer was lower than usual, indicating that the British needed a quick advance before time ran out!
In my opening move I called in artillery support in the form of a point barrage on the German reservists in the woods. This is a particularly devastating attack and the Germans suffered badly.
Whilst the artillery fell the British line moved forward. I needed to get across the field as quickly as possible, so the supporting tanks fell behind the infantry.
The Germans were able to fire at the advancing infantry but with little effect.
In the centre of the field the British infantry started to assault the woods where the Reservists were sheltering.
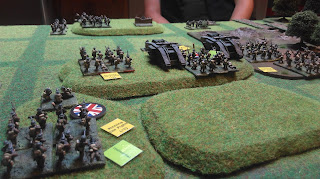
And on my left flank the German machine gun on the objective was threatened by two battalions whilst the tanks nosed forward towards another objective.
The woods were cleared with little trouble and the field gun on the road was quickly overrun.
The German reservists fell back with heavy casualties!
Two of the objectives were quickly taken and I prepared the assault on the next two. So far only a single German Machine Gun had arrived as a reinforcement. The British bombardment on the German rear areas must have been working!
The Germans launched their own artillery bombardment and caught my battalions in the open and caused heavy casualties.
Despite this set back, the combined arms of infantry and tanks captured a third objective and forced the German battalion off the hill in confusion.
The left flank was now secured with barely any casualties.
Even with the arrival of more German reinforcements things were looking good for the British.
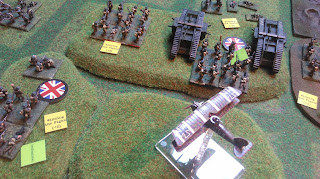
Suddenly, a German ground attack aircraft swooped down and began strafing the British forces.
This allowed the German infantry to move into a position to try to assault the British off the hills again.
Before he could I unleashed the last of the British artillery and completely smashed up the attacking infantry and the newly arrived reinforcements. Perfect timing!
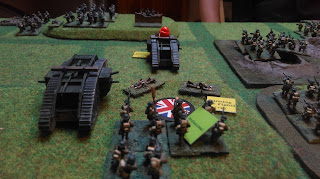
In a final attempt to reduce the German forces, I attacked from one of the hills, which was repelled. But attacked with the tanks and infantry to drive the Germans back from the objectives. This worked and one of my damaged tanks moved forwards.
Bad morale fixed the Germans in place meaning their attacks had lost all impetus. The British pushed through the woods and controlled the road that had been used by the German reinforcements.
The Germans rolled for the count-down timer and the game ended. All four objectives were in British hands.
This was a complete walkover by the British, they only lost a battalion and a half's worth of casualties.
I was surprised by the speed of the British advance, but the Germans were thinned out at the beginning having to have a third of their force off table as a reserve, along with the usual depletions which further reduced his forces. This left him with a thinly spread defence line that couldn't hold back the combined arms of infantry and tanks. If I had been in defence, I would have swapped the field guns for infantry battalions, but hindsight is a great thing!
If you are interested in learning more about the Battle of Amiens, here's a few books that will fill in the history:
Amiens 1918: The Last Great Battle. James McWilliams & R. James Steel
For those fans of podcasts, Sir Hew Strachan has an in-depth look at the Battle of Amiens HERE.
Rob Thompson has also written a paper for the Western Front Association about the planning of the battle and the logistical challenges, click HERE for a PDF of the paper.
There's plenty there to get your teeth into!


Really nice, is that n 8 x 6 grid If so is that standard for square bashing and who does those figures. Copying this to The Wargames Site as well. Thanks for posting this, I like grids and this is just very different.
ReplyDeleteThanks Norm, I replied on TWW, but in case anyone else is reading this: the grids are 6" squares on a 4 x3 ft board, which is standard Square Bashing size. All figures are from Peter Pig, except two tanks from PSC's Great War expansion!
DeleteGreat game report and links. Enjoyed reading it.
ReplyDeleteIt is a much overlooked part of the war, sadly understandably so when one realises the English department 'owns' the First World War not the History departement....
Cheers,
Pete.
Thanks Pete, I'm glad you liked it. Yep, I am with you, the First World War is often seen through the prism of a handful of poets...
Delete