Tiny Trees and Weeny Woods
Mixing 3mm tanks with 6mm trees just wasn't working for me and I needed some woodland areas for Rommel. I had a think about how to represent forests and woods in such a small size, played around with some clump foliage and came up with these. They are not kale pizzas, no matter how much they look like it...
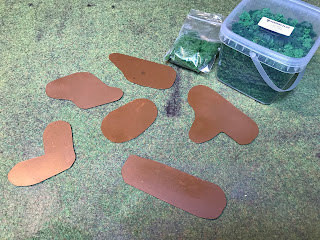
Rommel plays at a high level of organisation and each 6" square on the board represents a kilometre square in real life. Therefore, I was able to abstract the woodland areas and make them look like a canopy of foliage rather than having each individual tree represented. Looking down on woodland, you can see that it has been shaped by the landscape around it. Roads, rivers, fields and urban spread creates the basic shape in plan and in the largely rural areas of Russia these shapes are less formalised than in modern times. With this in mind, I cut out several pieces of plasticard in random forms as the base of my woodland. I made sure they were all smaller than 6" so that they would fit in a square for Rommel. That they don't cover the entire square doesn't matter, it's enough to indicate there is woodland for game purposes. I painted the bases in Vallejo's Flat Earth and varnished them. Next up, I mixed two types of clump foliage of slightly different colours.
I used an old take-away carton to mix the foliage and break it down from the large clumps it comes in (don't forget to wash this first, otherwise you'll have a forest that smells like a curry. However, this is also a good excuse to order take-away: win/win). To this foliage mix, I added a LOT of PVA glue, along with some water to thin it down. You'll need a lot of glue here as the foliage soaks it up and that is what you are wanting to happen. Keep adding glue and water until all the foliage is covered and pretty wet with glue. Don't use too much water, but keep adding a small amount at a time otherwise the glue will be too watered down. As you can see, I use a large brush to mix this mess together.
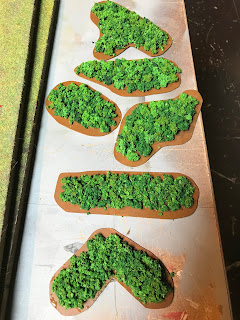
Then it is simply a case of carefully pouring out the foliage onto the bases with the brush and using your fingers to mould it into shape. Be careful here as it's a messy job and you may not cover yourself in glory if you do this on the best dining room table... I used more take-away boxes (nom nom) as containers to mitigate the mess of PVA and foliage if the piece was small enough to fit in the bottom flat. I also went a step further and poured watered down PVA glue over the top of the pieces at this point as well. You literally cannot have enough glue on these things!
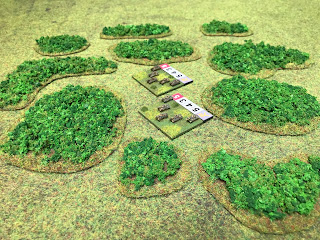
Then it's the waiting game. The first batch took at least a week to dry out completely. You'll know they are dry as the foliage will be pretty solid and won't fall off even if you tip it upside down. If the foliage does fall off, just repeat the glue/water mixing again and wait for it to dry once more. Each time you add more glue, the better it will be when finished. There's no such thing as 'too much glue' here. I have also spray varnished mine, just as an extra precaution and also to dull down the shine of the dried PVA. The final stage is to simply add static grass to the exposed brown base and hey presto: you have some woods! Here they are with some 3mm German tanks for scale:
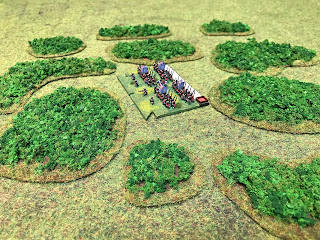
Although these intended for games of Rommel, I will probably also use them in my 6mm Blucher games as well. I use 3mm buildings for this game as well, so why not 3mm woodland? As a comparison, here is one of my Napoleonic brigades within the trees.
It's a dead easy process, but one that takes a long time to dry, so make sure you have somewhere to put them out of harm's way as the glue dries. I hope this has been of some help and gives you an idea for making your own.
I am selling some sets of Legion figures on EBay (cheaper than FGG, I might add!). They are all unpainted but come with the cards and tokens. I have a limited stock, so click the links below to see them:
All with free postage in the UK!
Today is also the 100th anniversary of this picture taken at the Riqueval Bridge 29th September 1918, with Brigadier General J V Campbell addressing troops of the 137th Brigade (46th Division) over the St Quentin canal. the capture of the canal was one of the pivotal moments during the last 100 days of the First World War. This is one of my favourite pictures from the war, not only because of what it represents, but that if you have a large enough quality image you can see the individual men's faces.
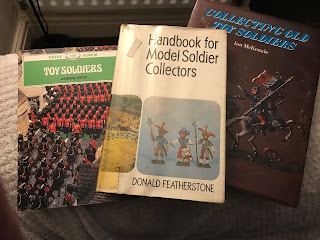
And finally, our cat-sitter left me a fine present the other day, three
old school books on collecting model soldiers, one by Donald
Featherstone. This appears to comprise of lists of figure manufacturers'
addresses, including Don's! So of course, I looked it up on Google street view.




They look great- they match the scale better and don't get in the way as much.
ReplyDeleteCheers,
Pete.
Cheers Pete, yeah, you can easily put the tank bases on top of the trees with no problem. Plus they don't cover the entire 6" square
DeleteHi and great idea as I've been struggling to find something that works for woods. One question, what do you mean by foliage? Is this something you buy at a railway hobbies shop?
ReplyDeleteThanks
Sean
Hi Sean, thanks for the comment. The foliage is called clump foliage and is used in railway modelling. Search EBay for ‘clump foliage’ and you’ll find some.
Delete