Moonscapes and Treeless Forests
I have already built several terrain pieces specifically for Square Bashing and this trend continues as I need a few more pieces for the game. The majority of the terrain pieces in Square Bashing are 12 inches by 6 inches in size, with the objectives being 6 inch square. A while ago I bought and cut several thin MDF pieces for this purpose, but I also needed a few bits and pieces to make another rough ground piece and what is described as a 'dead wood' objective.
I took the dead wood to be a shattered woodland, typical of a lot of First World War pictures, like this one of Delville Wood in 1916:
I took the dead wood to be a shattered woodland, typical of a lot of First World War pictures, like this one of Delville Wood in 1916:
I am not keen on propagating the mythological perceptions of the First World War and this is why my battalions have grass green bases rather than the ubiquitous mud. However, artillery did still churn the ground up in the latter years of the war (which is the period my figures represent) and a lot of battles in 1918 were fought over the shattered land of previous years. So therefore, I reasoned that there would still be many shell holes old and new around and some would be big craters as this picture of an American gun firing in September 1918 demonstrates:
I was directed to Early War Miniatures who produce sheets of plastic shell holes for £6.50! And you get two sheets in a pack! That's thirty shell holes and an absolute bargain! They come in two A4 sheets of vac-formed shell holes and the best thing is that each sheet is different:
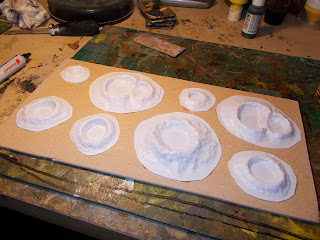
The sheets are sold as 20mm shell holes, but a hole in the ground is a hole in the ground and there would be some pretty big ones from the sizeable artillery employed in the First World War anyway. The individual shell holes are cut out easily as the plastic is thin enough to use scissors on and I trimmed a few out easily. Using eight holes I started with the rough ground terrain piece:
However, dead wood objective tile is going to have trees added to it, so I left space for them. On both of these tiles I used polystyrene cement to glue the shell holes down. I was going to use Superglue but I thought that the porous nature of the MDF wouldn't create a good bond. However, the polystyrene cement would melt the plastic to the MDF and create the bond that way. t worked with no problems and the boards were ready for the next stage pretty quickly.
Obviously the shell holes stand out against the base, so they needed some filler to make the levels correct. I use this stuff, which I bought from Wilkinson's (here in the UK) and is about a third cheaper than any named brand, despite doing exactly the same thing.
The filler was spread across the bases with my finger to merge the shell holes with the base.
I did this with both bases and left them to dry overnight. This will be covered so it doesn't have to be smooth and a rough surface also adds to the natural bumps in the ground.
The next stage was texturing the bases, this was done with PVA glue painted onto the boards then covered in sand. I also added a bit of sand to the bottom of each crater as they are flat based due to the manufacturing process.
This the point that the two boards split. The rough ground is almost complete now besides the painting. This was achieved relatively quickly, I used Humbrol Dark Green spray for the grass and Burnt Umber for the undercoat of the shellholes.
I won't describe every stage after this, but it was a series of dry brushing in various shades to get the right effect. The grass was inkwashed with Flat Earth and then dry brushed with yellow. The shell holes were a little more complex, the correct shade was achieved with various browns, greys and khaki shades dry brushed over one another until I had quite a greyish brown look to the holes and that was it! This was a pretty simple piece to make and looks reasonably effective.
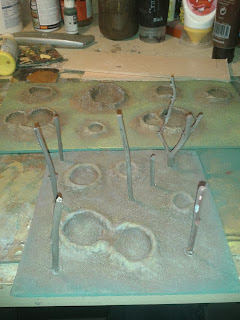
The dead wood base, on the other hand, was slightly different. I have been trying to work out a way of having trees on the base, but not interfering with the figures' bases during a game. I decided to use actual twigs rather than buying any miniature versions of ruined trees; not only is it cheaper to clip a tree in the garden, but it also looks more realistic if you use real wood! I wanted these twigs to be removable, so I figured the best thing to do was to drill holes where they would stand on the base. I got out my trusty Dremel drill and went to work.
I tested the holes and found that they needed to be opened out a little bit, so I used a thin circular hand file to widen the holes and tried out the twigs again and hey presto!
I didn't take any photos of the painting process as it was very similar to the rough ground with the exception that it was more brown in the centre where the forest floor would be. Here it is (crap picture taken on my mobile phone...). The trees were left in their natural state, why repaint something that looks correct already?:
The base still looked a little bare, so I added more broken twigs to it and broke a lot of smaller bits to scatter over the entire area. These were then fixed in place with the spray varnish. If they come off in the future I can easily add more.
So here is the final piece with the 'trees' in place. These can still be removed so it shouldn't interfere with movement in games and helps with storage:
I was slightly worried that the shell holes may look a little bit too big against my 15mm figures as they are sold as 20mm shell holes (but a hole is a hole is a hole...), but as these next two pictures show, they are about the right size:
Two battalions of British infantry attack the dead wood objective held by a German machine gun.
I'm happy with how these terrain pieces turned out, the Early War Miniatures shell holes worked really well for the purpose. I can't recommend them enough and hopefully this tutorial has demonstrated their diversity.
The EWM shell holes score high on a number of points, low cost, quick delivery and usefulness! Go forth and buy some!
In other news, yesterday I graduated from the University of Birmingham with an MA in British First World War Studies.
The EWM shell holes score high on a number of points, low cost, quick delivery and usefulness! Go forth and buy some!
In other news, yesterday I graduated from the University of Birmingham with an MA in British First World War Studies.


Interesting and useful product, far easier than trying to make your own. Congrats on graduating.
ReplyDeleteRegards,
Matt
Thanks Matt, yes that was the point, moulding my own shellholes would have been a real hassle!
DeleteKudos on an awesome terrain piece and graduation.
ReplyDeleteThanks Tal, I haven't had Kudos since I had a blog on Myspace!
DeleteCongratulations on graduation!
ReplyDeleteThanks for the terrain tutorials and other entries.
Thanks PanzerCDR, I'm glad you liked it! Thanks for the kind comments!
DeleteWonderful terrain! I really enjoyed making something similar with a shell-shattered wood. I'm sure you'll have great fu using it. And huge congratulations on your graduation! Is there any chance of seeing your MA dissertation on the literature of gas warfare online sometime? (hint, hint!)
ReplyDeleteThanks Sidney! I have a few more bits and pieces to make with these craters, so they will no doubt be fun to make as well. And thank you very much, that's really appreciated. I may publish it here on the blog, for people to download.
DeleteAlex, I know for sure that I am not the only person who would find it a very interesting read. I was always deeply grateful to David Kenyon for publishing his PhD thesis "British Cavalry on the Western Front 1916-1918" online in the period before his book on the same subject came out. But whatever you decide, well done again!
DeleteOK, you've convinced me! I'll post up a copy of the PDF on my next post (in the next couple of days...). You know Dr David? He's a good friend of mine and I have worked with him over the past ten years on WW1 sites in France and Belgium. He's a good man.
DeleteI know David but only through wargaming. A friend of his put him in contact with me at a time when I was writing a wargaming article about using cavalry in Great War wargames. I used his PhD thesis a lot for the article, along with Badsey and the Western Front volume of the Marquis of Anglesey's history (volume 8, I think). The footnotes in particular were really useful to help me track down other material. I ended up sending him the article and he was really encouraging and helpful. He seems to be a real gentleman, and I certainly owe him a beer sometime! And thank you again for posting your MA thesis!
DeleteYep, he's a fine fellow indeed. He keeps dragging me out to France to dig up trenches so I certainly have no complaints about him! I'd like to see the article, a trade for the thesis? and, again, no problem, I just hope you enjoy it!
Delete