The Country Pile
Following on from the building of scenery tiles for Square Bashing, I started work on one of the objective squares; the ruined Château. I used this tile in the last game, but this post is about how I constructed it. The objective tiles have dimensions of a 6"x6" tile rather than the usual 12"x6" of the other terrain types.
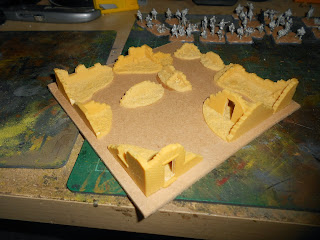
I dug out some ruined walls from Ironclad Miniatures that I have used before and glued them to an MDF tile of the correct dimensions:
It has the appearance of a reasonably sized building with internal walls which shouldn't interfere with the bases of the figures when being used in a game as they are low in height. The next stage was the bring the level of the board up to the bottom of the wall bases, which I did with the trusty old Pollyfilla:
Then it was put aside to dry overnight. Using PVA glue I then added a mix of sand, railway modeller's ballast and small pebbles sieved from the sand to give it a textured base.
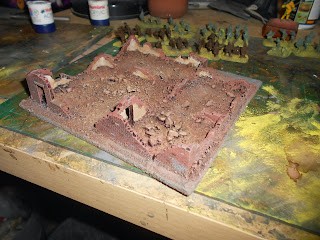
When this was all dry, the last stage of preparation was the undercoating, which I did with some cheap spray paint in brown then black. This didn't go on so neat, but it doesn't matter too much as it's mainly to seal the rubble mix and just give a basic undercoat:
Then it was onto the painting proper, the walls were painted in Humbrol Brick Red, which was then highlighted with Burnt Umber and various greys on some of the bricks and door fittings. There are also patches of plaster on the interior walls and these were painted in Vallejo Deck Tan. The interior rubble was heavily drybrushed in Brick Red with various browns and greys added as dry brush layers. The final thing to do was the wash the interior plastered walls in Vallejo Beige Brown, and the interior rubble with Burnt Umber. I edged the base with a medium grey, just to give it a border and this was also washed with Burnt Umber. I didn't take any photos of these stages as they were done pretty quickly and would be too subtle for the camera to show much progress, but this is what I ended up with:
Here it is with a British Higher Command stand observing a battle with support from two MGs. I'm particularly pleased that the rubble came out as a different shade to the walls, but that was down to the ink wash.
I was hoping to get something like this building from the Battle of Third Ypres in 1917. I left off the wooden boards as I thought they may be too brittle during a game, but I think I have achieved the effect that I wanted of a flattened structure.
I have a few more terrain boards to make for SB, including some shattered woods and more broken ground, so there will be more of this to come in the future, but for now, thanks for looking!


Spiffing! That's your best one yet.
ReplyDeleteThank you, of course, you've not seen it in the flesh yet!
DeleteCheers Jay, it was a nice little project. Now on to the next!!
ReplyDeleteGood, very good! A great work on these ruins...
ReplyDeleteThanks Phil, I'm glad you liked them!
Delete