British Trench Warfare 1917-1918
A couple of years ago I bought a set of three interlocking trenches from Early War Miniatures. They have sat languishing in my 'to-do' pile for what seems like an eternity. Until this week. I had mainly agonised over how to make them more solid as the vac-forming process made the plastic seem a bit flimsy. I had a few ideas from using papier mache to insulating foam to bulk out the underside where the piece had been vac-formed. I thought it would add a bit of weight to the model and help it from getting damaged. However, rethinking it, I thought it would be hard to store these items with a solid base and leaving them open at the bottom would allow them to be stacked easier. With this mental breakthrough achieved, I set about painting one as a tester. My early attempts looked a bit slapdash and I realised that my drybrushing skills were not up to the level of being able to competently deal with the large areas of flat surface. So, even though I had already spray-painted the entire thing, I then added sand to all the areas outside of the trenches. This was done by painting PVA on the piece and chucking the sand all over it. Once dried, this was then resprayed and the drybrushing turned out a lot better than before.
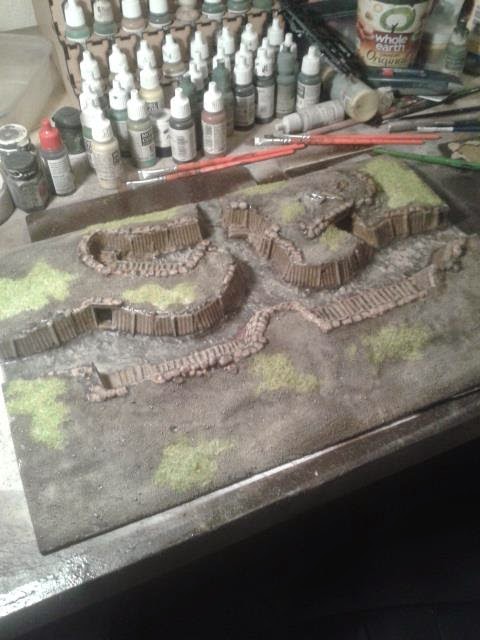
It also took me a while to actually settle on the colours that I thought would be appropriate. I wanted the trenches to match the bases of my 20mm First World War figures, which I had painted with Vallejo's German Camo Black Brown. Whilst looking for primers in The Range, I stumbled upon some car sprays, two of which match the bases I already have: Vauxhall Brazil Brown and Ford Rio Brown. Both are essentially the same colour and a glossy match for the German Camo Black Brown. Also, an added bonus was that, being car paints, both were very strong when applied, so along with the PVA and sand, the plastic base was now very rigid (and hopefully hard wearing...).

Then it was simply a case of a heavy drybrush of Vallejo's Khaki. The wicker and wooden revetments were first painted in Khaki Grey, with a liberal wash of Army Painter's Dark Shade and a final drybrush of Vallejo's German Camo Beige. The sheets of wriggly tin were painted in a rusted colour, with a drybrush of gun metal. A final touch was to add clumps of static grass, to break up the shape of the piece and also to match my existing figures' bases.

It was a simple enough job, once I got started, however, being such big pieces (40cm long by 28cm wide), it took quite a while to paint, but I am pleased with the result. Here's how it looks with some Lancer Miniatures 20mm British soldiers manning the parapet from the firing bay:

And the other firing bay:

As you can see the One Pence pieces that I mounted my figures on have no problem fitting in the trench.

I would think these have no real problem with 15mm figures as well. I have two more of these to paint, and they will be done soon, so check back for future entrenchments.
In other news, I bought part of the German vehicles that I need for the Stalingrad project (I had a recent unexpected windfall). They came from Plastic Soldier Company and were delivered in two days, how's that for customer service!? There are still a few odds and sods that I need to fill out the gaps, but these will keep me busy for a while. Plus whilst in Sheffield, I happened upon the new Blucher rules, by Sam Mustafa, I have hankered for Napoleonic wargaming for years, I used to play it in 20mm, but have never done any recently. I'm looking forward to reading what looks like an beautifully produced book, with great reviews and seeing if my itch can be scratched...
In other news, I bought part of the German vehicles that I need for the Stalingrad project (I had a recent unexpected windfall). They came from Plastic Soldier Company and were delivered in two days, how's that for customer service!? There are still a few odds and sods that I need to fill out the gaps, but these will keep me busy for a while. Plus whilst in Sheffield, I happened upon the new Blucher rules, by Sam Mustafa, I have hankered for Napoleonic wargaming for years, I used to play it in 20mm, but have never done any recently. I'm looking forward to reading what looks like an beautifully produced book, with great reviews and seeing if my itch can be scratched...

Thanks for reading!

Excellent work as always, WW1 as always interested me and you posting nice pictures like these doesn't help. No more NEW projects!!! No more NEW projects!!! ok maybe when I've finished work a couple of the current projects, inspiring work as always
ReplyDeleteThanks Russ, I am sorry to tantalise you... Just so you know, there are loads of great First World War rules sets out there, the ones I use are Through the Mud and the Blood and Square Bashing, both worth checking out and maybe enough to push you into a new project...
DeleteNot sure my wife would see it like that! bless her!!
ReplyDeleteGreat work. The colour choices work well.
ReplyDeleteFor what its worth when I painted the stand alone position from Early War Miniatures I got a tube of silicone caulking from the pound shop and smeared it on the underside to give it more strength.
Cheers,
Pete.
Thanks Pete, I ran through a few possibilities of strengthening the piece in a similar way. I had not thought of that one, but you've given me an idea...
DeleteRealistic, creative, useful and beautiful...love this job!
ReplyDeleteThank you Phil, the hard work was all done by EWM, I just smeared some paint on them!
Delete